Difference between revisions of "GitHub Install"
From webCoRE Wiki - Web-enabled Community's own Rule Engine
m (→Summary) |
m |
||
| Line 2: | Line 2: | ||
These instructions will guide you through installing via GitHub integration all the way to adding devices and authorizing your browser for use. | These instructions will guide you through installing via GitHub integration all the way to adding devices and authorizing your browser for use. | ||
| − | Edit August 2020: Not sure if GitHub will work in the new app, but the new SmartThings app has [[New_SmartThings_App|different | + | {{Warning |Edit August 2020: Not sure if GitHub will work in the new app, but the new SmartThings app has [[New_SmartThings_App|different installation steps]].}} |
=Installing Source Code into SmartThings Cloud= | =Installing Source Code into SmartThings Cloud= | ||
Revision as of 23:56, 17 August 2020
Contents
Summary
These instructions will guide you through installing via GitHub integration all the way to adding devices and authorizing your browser for use.
| Edit August 2020: Not sure if GitHub will work in the new app, but the new SmartThings app has different installation steps. |
Installing Source Code into SmartThings Cloud
- Login to the SmartThings IDE.
- Click on My SmartApps.
- Click the Settings button at the top of the page.
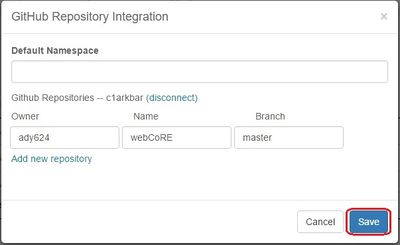
- Click the Add new repository link at the bottom of the pop up.
- Enter
ady624in the Owner column. - Enter
webCoREin the Name column. - Enter
masterin the Branch column. - Click Save (do not hit the Enter key, it will exit the form without saving).
- Click Update From Repo.
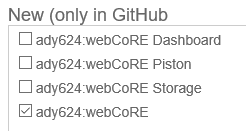
- Select webCoRE (master) from the list.
- Check "webCore.groovy" from the New (only in GitHub) box.
 Warning:
 Do not update all at once - Check the Publish checkbox at the bottom of the pop up.
- Click the Execute Update button.
- Click again on Update From Repo.
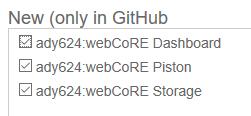
- Select webCoRE (master) from the list.
- Check "webCoRE Piston.groovy", "webCoRE Storage.groovy"and "webCoRE Dashboard.groovy" from the New (only in GitHub) box.
- Check the Publish checkbox at the bottom of the pop up.
- Click the Execute Update button.
Enabling OAuth for webCoRE
- Navigate to the My SmartApps page if you are not already there.
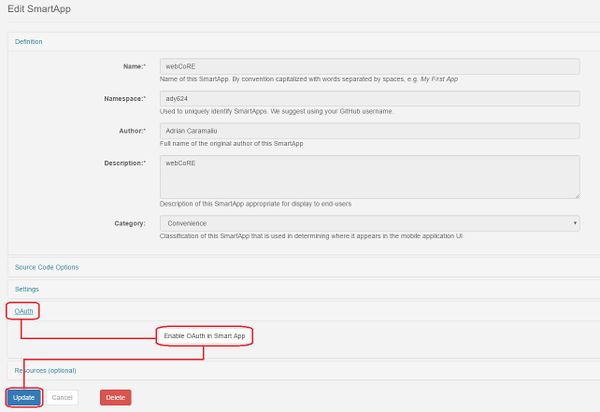
- Click the edit button to the left of ady624 : webCoRE, it looks like a rounded square with a pencil in it.
- Scroll down and click on OAuth.
- Click the Enable OAuth in SmartApp button.
- Click the Update button at the bottom of the page.
Installing webCoRE
- Open the SmartThings app on your mobile device.
- Tap the Marketplace icon at the bottom of the screen. If you are in a Room or Device within the app you will need to go back to My Home.
- Tap the SmartApps header at the top of the page.
- Scroll down and tap My Apps.
- Scroll down until you find webCoRE and tap it. Do not tap webCoRE Piston. If you can't find webCore you likely skipped some steps above.
- Tap Next.
- Here you can change the name from webCoRE to anything you desire then tap Next. (Recommend leaving it unless you are working with multiple instances.)
- Choose a password and expiration length then tap Next.
- Scroll through the list and select all of the devices you want webCoRE to have access to. If you do not do this, you will not be able to use those devices in webCoRE. This must also be done again when adding new devices to your SmartThings Account. webCoRE will not automatically import them.
- Tap Next.
- Tap Done.
Opening the new dashboard from your phone
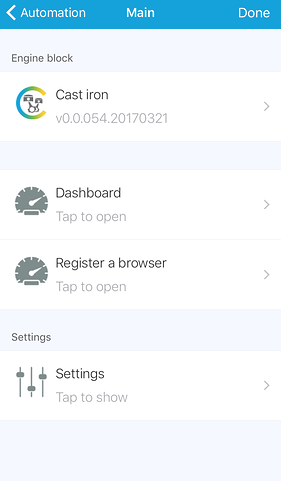
- From within the SmartThings app, tap the Automations icon at the bottom of the screen and select the SmartApps section.
- Scroll down and tap the name of the webCoRE instance you are trying to access. This is typically webCoRE, unless you edited the name during the installation process.
- Tap Dashboard.
- You will be prompted to enter the security password, the same password you created when you installed webCoRE.
Using webCoRE from another browser
You cannot bookmark the URL you launched from the SmartThing app. In order to use webCoRE on another device you must follow these instructions.
- From within the SmartThings app, tap the Automations icon at the bottom of the screen and select the SmartApps section.
- Scroll down and tap the name of the webCoRE instance you are trying to access. This is typically webCoRE, unless you edited the name during the installation process.
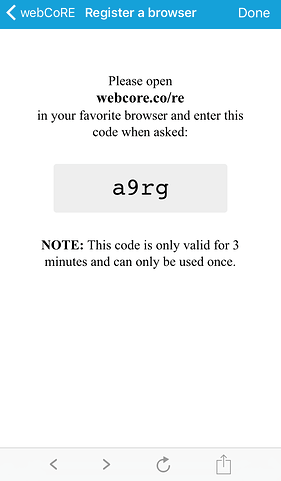
- Tap Register a browser, a page will appear providing you with a registration code. The code expires in 3 minutes and can only be used once.
- On your other device, open the browser and visit webcore.co/re
- Enter the code and click Register.
- You will be prompted to enter the security password, the same password you created when you installed webCoRE.
Github Installation Troubleshooting
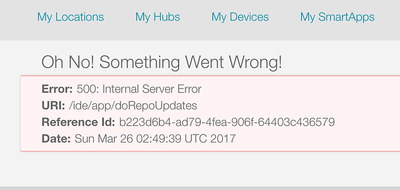
If you receive this error it may be because you installed and published both "webCore.groovy" and other SmartApps at the same time. Please do them in order per the instructions. Be sure to install/publish "webCore.groovy" first then the others after (See steps 11-16). You can do the other SmartApps at the same time after "webCore.groovy" has been installed and published.

