Difference between revisions of "webCoRE"
| Line 94: | Line 94: | ||
| − | <seo keywords="webCoRE,dashboard,smart home,automation,SmartThings,rule engine | + | <seo keywords="webCoRE,dashboard,smart home,automation,SmartThings,rule engine,zigbee,z-wave,smart device" description="The official wiki for webCoRE, the Web-enabled Community's own Rule Engine SmartApp"></seo> |
Revision as of 16:57, 8 May 2017
Contents
General
The web Community's own Rule Engine (or for short, webCoRE) is a general rule engine for SmartThings. It works by allowing users to create scripts that are interpreted and executed by the SmartThings SmartApp, allowing for complex decisions. webCoRE is currently a work in progress. webCoRE reached the first Beta milestone on April 29, 2017 (version v0.1.097.20170429) Please review the webCoRE todo list.
Getting started
A few steps need to be completed before you can use webCoRE. First, webCoRE needs to be installed in your SmartThings account, then automations need to be configured. These are called pistons and will be detailed later. So let's start by installing webCoRE, please follow the 5 steps below.
Installing webCoRE
You must complete all of these steps.
- GitHub Install or Manual Install of webCoRE source code into the SmartThings Cloud
- Enable webCoRE OAuth in the SmartThings cloud
- Install webCoRE in the SmartThings mobile app
- Enabling webCoRE dashboard
- Enable webCoRE on Another Device
Understanding the basics
webCoRE is comprised of the three main components listed below.
The webCoRE child SmartApp (webCoRE Piston)
The webCoRE child SmartApp is also known as a piston. It is responsible for executing the automation script that the user creates and does the heavy lifting in the whole webCoRE ecosystem. It is directly managed by the webCoRE parent SmartApp, which can create, maintain, and delete a Piston.
The webCoRE parent SmartApp (webCoRE)
The wabCoRE parent SmartApp is the component responsible for managing the child SmartApp instances and their relationship with the Dashboard. It is the middle man that allows adding new Pistons, maintaining them, or deleting them. It is also responsible with the security of the whole ecosystem, allowing password secured access from the Dashboard.
The dashboard
The Dashboard is an HTML interface for webCoRE that allows users to manage their webCoRE installation. It is the central hub to controlling webCoRE, allowing the user to create, modify, test, and delete Pistons.
Anatomy of a webCoRE Piston
- Main article Piston
A piston is a script that contains a collection of elements, arranged so that the logic and flow of the piston perform tasks in a desired sequence. It is broken down into several sections, each having its own important role.
//todo: most details below need to be moved into the main article
The settings section
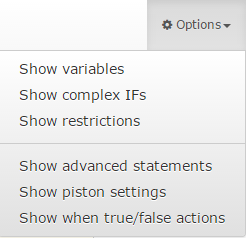
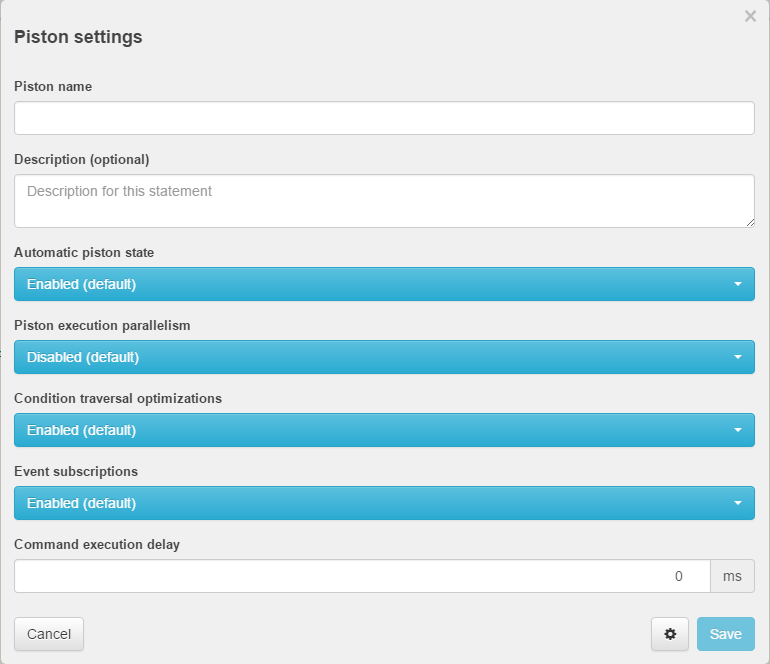
This menu is accessed from the piston editor. In the upper right hand corner select options and then enable Show piston settings
These settings allows configuration of how certain aspects of the piston function.
- Name - Change the name of a piston.
- Description - Give a description of what the piston does.
- Automatic piston state - Change whether the piston handles it state or make it manual and you can control the piston's state.
- Piston execution parallelism - //todo
- Condition traversal optimizations - //todo
- Event subscriptions - Allow event subscriptions or turn them off if you would like to make the piston a follow up style piston. If you disable this then you must have some other means for the piston to be fired.
- Command execution delay - A delay in milliseconds for commands to be executed piston wide.
The define section
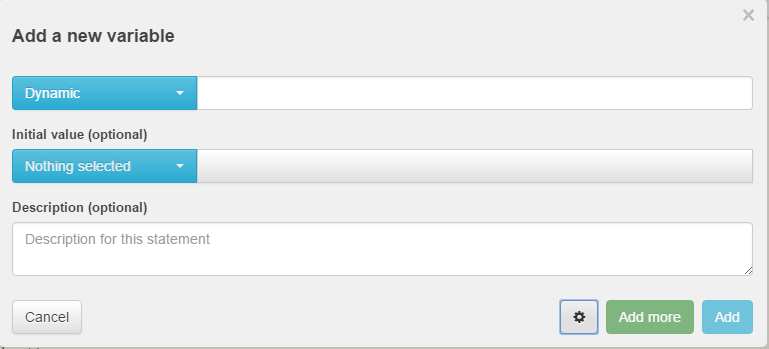
This menu is accessed from the piston editor. In the upper right hand corner select options and then enable Show variables
A very powerful feature of webCoRE is the ability to use variables. Think of variables as temporary pockets where you can store information and are able to later retrieve and use this information for any purpose. This information can be used either during the current piston run, or at a later time, when another event occurs.
- Type - You can select from the different Variable_data_types for you variable.
- Name - This is the empty box next to the type. Enter a name for your variable.
- Initial value - This is defaulted to
Nothing selected. If you decide to give it an initial value then that value will be used at each piston run regardless of what is stored in later piston runs. - Description - Give a description of what the variable is used for.
The execute section
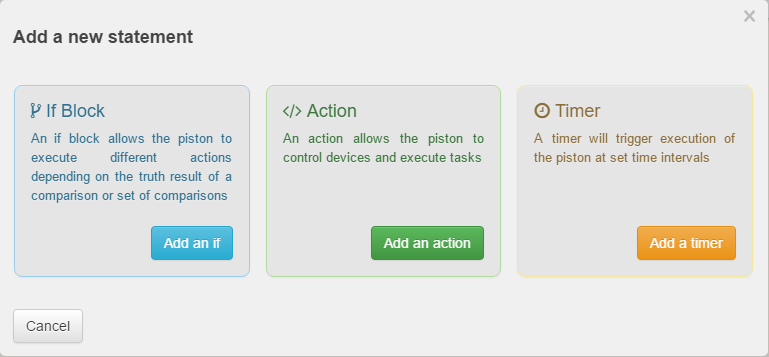
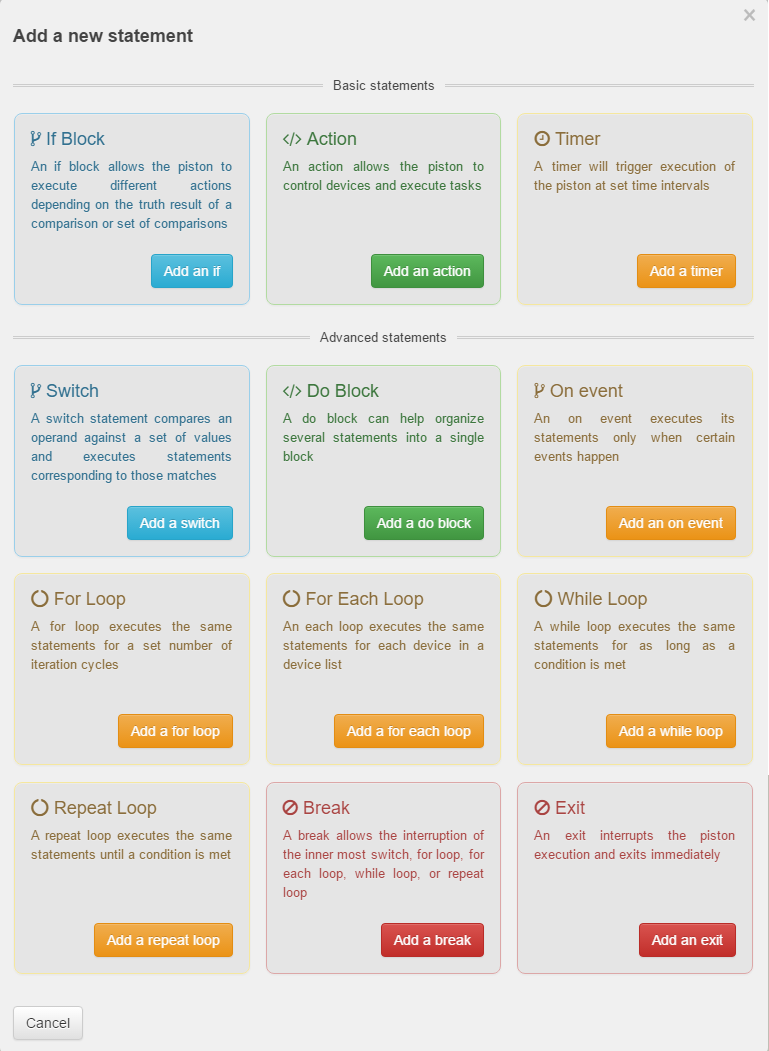
This section describes the piston's logic flow. This is the starting point of most executions. Whenever a device event happens, the piston starts its execution here. To get started click on Add a new statement
These are you 3 basic building blocks with their description listed below them. There are several more options to choose from aside from these three. In order to gain access to these you will again have to visit that trusty options menu in the top right hand corner and select Show advanced statments
After you do this and you click on Add a new statement you will now have access to all the available statement options.
Other Details
Creating your first piston
Once you finished the installation steps above, let's go ahead and create the first piston, the famous Hello World.
Sample Pistons
This section has some user contributed sample pistons. You can import any of these pistons using the import code displayed at the top of the piston.
