Difference between revisions of "WCmore's Tips"
m (→Coming Soon) |
m |
||
| Line 5: | Line 5: | ||
=== Simulated Switches === | === Simulated Switches === | ||
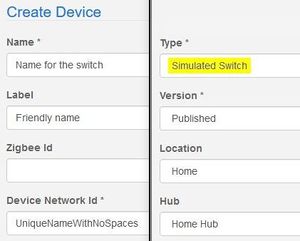
| − | [[File:SimSwitchCreation.jpg|thumb| | + | [[File:SimSwitchCreation.jpg|thumb|right]] |
I often hear people talk about "Virtual Switches" as well as "Simulated Switches", but they are not the same. Personally, I will only recommend using "Simulated Switches", since I have seen a lot of errors involving virtual switches. | I often hear people talk about "Virtual Switches" as well as "Simulated Switches", but they are not the same. Personally, I will only recommend using "Simulated Switches", since I have seen a lot of errors involving virtual switches. | ||
| Line 15: | Line 15: | ||
* Click on “+ New Device” in the top right | * Click on “+ New Device” in the top right | ||
| − | Then use the image on the | + | Then use the image on the right as a guide: |
'''Side Note:''' | '''Side Note:''' | ||
Revision as of 08:13, 25 March 2019
Hello and welcome!!
This is a collection of things that I have learned over the years. Stay tuned for more Tips & Tricks...
Contents
Simulated Switches
I often hear people talk about "Virtual Switches" as well as "Simulated Switches", but they are not the same. Personally, I will only recommend using "Simulated Switches", since I have seen a lot of errors involving virtual switches.
To create a SimSwitch, we can use a web browser to:
- Log into SmartThing's IDE
- Choose “My Devices” at the top
- Click on “+ New Device” in the top right
Then use the image on the right as a guide:
Side Note: Sometimes I have to use an "Incognito" or "Private Browsing Window" to be able to log into the IDE.
Once the device is added, ST will see it within a few seconds, but you will also have to add the device to webCoRE.
Adding devices to webCoRE
- Connect the device to SmartThings first
- Test the device using the SmartThings app on your phone to make sure the new device is working thru the hub
- Add the device to webCoRE by going to: Automation > SmartApps > webCoRE > Settings > Available devices > Available devices
- Select a category, and place a check-mark next to any device that you want webCoRE to see and/or control
- Save multiple times until you are back in the SmartApps page
- You can now use this device in webCoRE. If you still do not see it, try a hard refresh to your Dashboard. (Ctrl-F5)
New Section
More stuff coming soon...
Handy Links for Reference
Here are a few links that I have found to be helpful
webCoRE
- Dashboard (where we create & edit our pistons)
- webCoRE Forum - Latest Topics (great community for like-minded people)
- webCoRE Forum - Tutorials
- webCoRE Forum - Example Pistons (great place to get inspired!)
- webCoRE Functions (data processing & conversions)
- webCoRE Expressions (mathematical constructions)
- $twc.weather (which replaces $weather)
Other Resources
- SmartThings IDE (where we can add new devices)
- Amazon Alexa Settings
- Font Awesome Icons (can be inserted in tiles, piston states etc)
- Emoji reference (can be inserted in SMS, notifications, tiles, piston states etc)
Advanced Pistons
- Making voice announcements & controlling Amazon Alexa Echo
- WebCoRE asks a question, my voice response determines the action
- Send a notification to only ONE device without a SIM card
- Gauge for Length of Day (showing Solstices & Equinoxes)
- Making a 24 hour Clock with webCoRE
Coming Soon
- Drag, Drop & Copy Code
- External URL
- Two Hub Communication


