Difference between revisions of "Multiple Instances"
(→How to Create and Setup Another webCoRE Instance:) |
(→Reasons for Creating Multiple webCoRE Instances:) |
||
| Line 5: | Line 5: | ||
* Test new pistons out without affecting your normal webCoRE instances. You can use virtual devices to accomplish this without having to test with your actual devices. | * Test new pistons out without affecting your normal webCoRE instances. You can use virtual devices to accomplish this without having to test with your actual devices. | ||
* Split up the memory usage for webCoRE if you have a lot of pistons. | * Split up the memory usage for webCoRE if you have a lot of pistons. | ||
| − | * Recommended if using a lot of Piston | + | * Recommended to move all of your piston tiles that's setup if you're using a lot of them. Piston tiles can display the status of devices, modes, statuses, information, etc. |
== How to Create and Setup Another webCoRE Instance: == | == How to Create and Setup Another webCoRE Instance: == | ||
Revision as of 20:15, 19 January 2018
This section goes over how to create multiple instances of webCoRE.
Reasons for Creating Multiple webCoRE Instances:
- Test new pistons out without affecting your normal webCoRE instances. You can use virtual devices to accomplish this without having to test with your actual devices.
- Split up the memory usage for webCoRE if you have a lot of pistons.
- Recommended to move all of your piston tiles that's setup if you're using a lot of them. Piston tiles can display the status of devices, modes, statuses, information, etc.
How to Create and Setup Another webCoRE Instance:
1. Add webCoRE Smartapp again like you did when you first installed it, follow this section of the Wiki on how to do so: https://wiki.webcore.co/#Installing_webCoRE_2
2. Once another instance is added, it's recommended to renaming all of the webCoRE instances that you have created so you know which one is which.
3. After renaming all of the webCoRE instances, log into the dashboard using the dashboard.webcore.co site. Follow this section if you need help with logging into the dashboard: https://wiki.webcore.co/#Using_webCoRE_from_another_browser
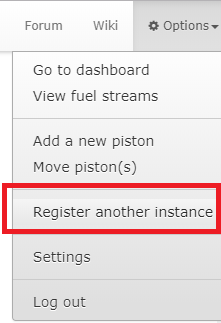
4. Click on options on the top-right / Register another instance:
5. Dashboard site will now ask for a code, follow instructions here to get a code to register the second instance in the webCoRE dashboard: https://wiki.webcore.co/#Using_webCoRE_from_another_browser
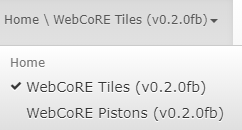
6. Now another webCoRE instance will be registered on your dashboard. Switching between the multiple instances can be done by clicking on this section that is on top-left on your dashboard:
7. It'll display the names you gave both of your webCoRE instances on that section like that screenshot shows above.
8. Once multiple instances are registered in your webCoRE dashboard, a new "Move Pistons" option will now be available on left side of your dashboard. This option hasn't been implemented yet. The only way to move a piston to another instance of webCoRE is adding a piston like you normally do ("Add a new pistion" option on left) then use the "Create a duplicate piston" option. Make sure you are on the instance of webCoRE that you want to add a piston to before you do that part.


