Difference between revisions of "WCmore's Tips"
m (→Coming Soon) |
m (→Coming Soon) |
||
| Line 93: | Line 93: | ||
* Two Hub Communication | * Two Hub Communication | ||
* Passing Arguments | * Passing Arguments | ||
| − | * Daisy-Chaining Pistons | + | * "Daisy-Chaining" Pistons |
* Tasker (Controlling & being controlled by an Android device) | * Tasker (Controlling & being controlled by an Android device) | ||
* EventGhost (Controlling & being controlled by a Windows PC) | * EventGhost (Controlling & being controlled by a Windows PC) | ||
{{TipsTOC}} | {{TipsTOC}} | ||
Revision as of 02:44, 27 March 2019
Hello and welcome!!
This is a collection of things that I have learned over the years. Stay tuned for more Tips & Tricks...
Contents
Simulated Switches
I often hear people talk about "Virtual Switches" as well as "Simulated Switches", but it's important to note that they use different Device Handlers, so they are definitely not the same. Personally, I will only recommend using "Simulated Switches", since I have seen a lot of issues involving virtual switches.
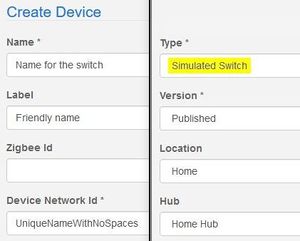
To create a SimSwitch, we can use a web browser to:
- Log into SmartThing's IDE
- Choose “My Devices” at the top
- Click on “+ New Device” in the top right
Then use the image on the right as a guide -->
Side Note: Sometimes I have to use an "Incognito" or "Private Browsing Window" to be able to log into the IDE.
Once the device is added, ST will see it within a few seconds, but you will also have to add the device to webCoRE.
Adding devices to webCoRE
- Connect the device to SmartThings first
- Test the device using the SmartThings app on your phone to make sure the new device is working thru the hub
- Add the device to webCoRE by going to: Automation > SmartApps > webCoRE > Settings > Available devices > Available devices
- Select a category, and place a check-mark next to any device that you want webCoRE to see and/or control
- Save multiple times until you are back in the SmartApps page
- You can now use this device in webCoRE. If you still do not see it, try a hard refresh to your Dashboard. (Ctrl-F5)
| ▲ Top ▲ |
.
External URLs (execute a piston from elsewhere)
Any piston can be run from any place that you are online. A few possibilities are:
- Clicking a link in a SMS message
- Clicking a link in an email or HTML document
- HTTP GET request from any app with that capability
- HTTP GET request from any OS (Windows, Android, RPi etc.)
- HTTP GET request from another SmartThings hub
- Command prompt / batch file / macro tool etc.
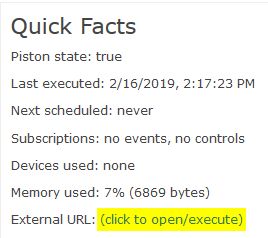
Each piston has a unique URL, which can be found at the very top of any piston -->
(Anyone that knows this URL can trigger that one piston whenever they want to, so this URL should be kept private, or only shared with those whom you trust)
So, for example, if you wanted a piston in your vacation house to trigger a piston in your main house, then the vacation house can make a web request like this:
... and the piston in your main house would trigger a moment later.
Generally speaking, the piston that is getting triggered by the external call should have no triggers of it's own. (conditions are OK though) Once the piston is saved, you should see this up top:
| ▲ Top ▲ |
.
Handy Links for Reference
Here are a few links that I have found to be helpful
webCoRE
- Dashboard (where we create & edit our pistons)
- webCoRE Forum - Latest Topics (great community for like-minded people)
- webCoRE Forum - Tutorials
- webCoRE Forum - Example Pistons (great place to get inspired!)
- webCoRE Functions (data processing & conversions)
- webCoRE Expressions (mathematical constructions)
- $twc.weather (which replaces $weather)
Other Resources
- SmartThings IDE (where we can add new devices)
- Amazon Alexa Settings
- Font Awesome Icons (can be inserted in tiles, piston states etc)
- Emoji reference (can be inserted in SMS, notifications, tiles, piston states etc)
Advanced Pistons
- Making voice announcements & controlling Amazon Alexa Echo
- WebCoRE asks a question, my voice response determines the action
- Send a notification to only ONE device without a SIM card
- Gauge for Length of Day (showing Solstices & Equinoxes)
- Making a 24 hour Clock with webCoRE
| ▲ Top ▲ |
.
Coming Soon
- Good Practices
- Drag, Drop & Copy Code
- Two Hub Communication
- Passing Arguments
- "Daisy-Chaining" Pistons
- Tasker (Controlling & being controlled by an Android device)
- EventGhost (Controlling & being controlled by a Windows PC)
| ▲ Top ▲ |
.


